Hello Peeps
I'm going to show you how to do a card that I saw Barbara Grey of +claritystamps do on Create and Craft and which I
did with my stamping group on Saturday 26th January and I promised that I would put up the instructions So here they are.
You will need:
Stamps x 3
Archival Permanant ink pad Sepia
Stamp cleaner
Clarity Handle / Acrylic Block
Clarity Silk Card/ Encaustic Art Card
Post-it-Notes.
Versamark ink pad
Big and Juicy ink pad in Foliage.
Speedball Brayer
Splodgemat
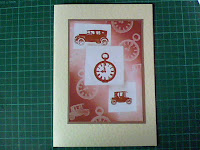
Here is a picture of the finished card as you can see it looks as though there are three layers to the card. Here's how it's done.

1) Here I have gathered a selection of stamps, archival sepia permanent ink pad and a clarity handle in which to mount the stamp, and stamp cleaner.
All the stamps used are by Clarity stamps
2) Here I have now stamped my chosen images on to my card and blotted it two or three times to make sure the ink is dry
3) You now need to cover your images with post it notes if you have a look at the picture you will notice that the middle post-it-note is slightly overlapping the top and bottom ones. This is important to get the desired effect at the end. Trim the post-it-notes as necessary.
4) Here as I mentioned above you can see the slight overlap

5) The white area can now be stamped randomly using the versamark. Use the same stamps as effectively this will be your back ground. So do all the white areas of the card.
Now we will colour the background. Firstly if you have a look at the ink pad you will notice that its a "rainbow" ink pad. I'm going to be loading up my brayer from the brown end and even then I eill only be loading about a third of the brayer. Once I have loaded the brayer I will use the splodge mat to remove excess ink.
Here you can see that I have removed some of the excess ink and because I have rolled it on my splodge mat it will stay wetter for longer so should I need more ink then I will just use whats on my mat.
Notice the way the brayer starts up in the top right hand corner, as I roll I will gradually roll towards the middle of the card.
So having done one side I turned it around and did the other corner, using the ink on the splodge mat as necessary. Notice the white area running diagonally through the middle of the card. This again will add to the overall effect of the finished art piece.
Next step now is to put in the "layers". As you can see I have removed the top post-it-note. Get a make-up sponge and form it in to a mushroom type ball and then gently dab on the ink pad REMOVE excess ink and then very lightly go around the edge of the post-it where it touching the white area.
Here is a close up of where I dabbed. Notice the amount of ink there's hardly any there you just want a slight hint of colour. Remove the bottom post-it and do the same again.
Once completed and the post-it removed it will give the illusion that the middle layer is lying on top of the other two.
The finished art work Matt and layered
Job Done. Thank you Barbara for your inspiration.
The Next Level
You will need in addition to the above
Detail Clear embossing powder.
As you can see from the instructions above I've numbered them only so far. You can take this concept a stage further with the addition of clear embossing powder.
So follow steps 1-5 above, go over the area with an anti-static bag. When you get to stamping with the versamark apply detail clear embossing powder and heat set. I would do this in stages rather then trying to do all in one go, believe me it wont happen lol. Notice the post-it still in place don't worry if you get powder on them just heat set as normal.
I then used a word stamp by clarity and randomly stamped all over again notice the post-it notes still in place. I used the archival sepia.
Begin by cleaning away the excess sepia ink with a piece of tissue.
With a applicator and splodge mat i then used a selection of distress ink pads to colour the background.I used Antique linen, Vintage Photo, and finished with Walnut stain. I would not recommend using a brayer as you do not want to get permanent ink onto your brayer. I started by going all over with the antique linen and gradually moving out to the edges with the other two colours.
So here is the finishes art work after the distressing. notice now how the wording has disappeared behind the embossing adding dimension to your work.
A close up of one of the corners with all the different layers now in place.
The finished art work Matt and layered and mounted onto a card front.


 5) The white area can now be stamped randomly using the versamark. Use the same stamps as effectively this will be your back ground. So do all the white areas of the card.


Looks lovely Andy and so much work gone into it!
ReplyDelete